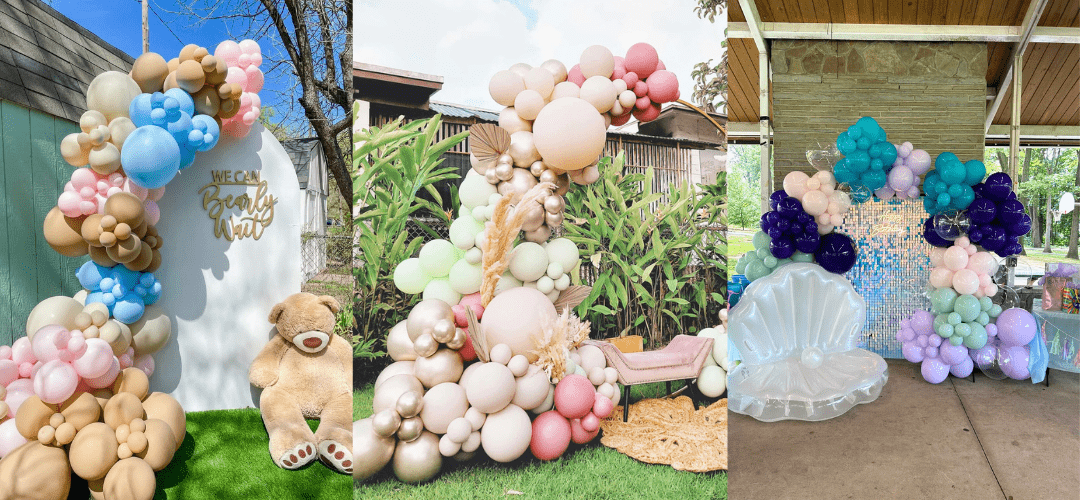
Balloon arches are show-stopping decorations that can elevate any event, from birthday parties to baby showers, weddings, and beyond. But if you’ve never created one before, it might seem like a daunting task. The truth is, with the right tools and a bit of guidance, anyone can assemble a stunning balloon arch.
This guide will walk you through the process, offering beginner-friendly tips and tricks along the way. Whether you’re planning a kids' birthday party or a grand celebration, a DIY balloon arch is a cost-effective and fun way to wow your guests.
Step 1: Choose the Right Balloon Garland Kit
The first step to a successful balloon arch DIY is selecting the right garland kit for your event.
1. Measure Your Space
Decide where your balloon arch will go—over a dessert table, around a doorway, or as a backdrop for photos. Measuring the space helps you choose the appropriate size for your garland.
2. Pick Your Garland Length
Balloon arches come in various lengths, and the size you need depends on your venue and desired impact. Here’s a general guide:
- 5 feet: Perfect for small accents or tabletops (~50 balloons).
- 10 feet: Great for doorways or photo booth frames (~100 balloons).
- 15 feet: Ideal for statement pieces or larger spaces (~150 balloons).
- 20 feet: A showstopper for grand backdrops (~200 balloons).

3. Shop for a High-Quality Balloon Garland Kit
Invest in a kit that includes everything you need: balloons in assorted sizes, balloon tape, glue dots, and a how-to guide. This saves time and ensures a polished, professional look. You can also use a customizable kit to match your event's theme perfectly.
Step 2: Gather Your Supplies
Most high-quality balloon garland kits come with the basics, but here’s a checklist to make your setup a breeze:
- Balloons: A mix of 5", 11", and 17" sizes for depth and texture.
- Balloon Tape: For stringing your balloons into a garland.
- Glue Dots: To secure smaller balloons and fill in gaps.
- Command Hooks or String: For hanging your garland.
-
Hand or Electric Air Pump: Save your breath—literally!
Optional extras: Giant 3-foot balloons, mylar accents, greenery, or ribbons for added flair.
If you purchase a kit from us, you'll get it all delivered to your doorstep in this cute little box!

Step 3: Assemble Your Balloon Arch
1. Inflate the Balloons
Use a hand or electric air pump to inflate your balloons. Pro tip: For a professional look, press the inflated balloon gently against a flat surface while releasing a small amount of air. This makes the balloon rounder and more symmetrical.
2. String the Balloons on Balloon Tape
Start with your medium-sized balloons (11" and 17") and attach them to the garland tape. Leave about 12 inches of tape free at one end to make hanging easier. Push the balloon necks into the tape holes and alternate colors and sizes to create a balanced look.
3. Hang the Garland
Using Command hooks or string, hang your garland in its designated spot. Begin by attaching the middle section first, then secure the ends. For free-standing arches, a backdrop stand is a great solution.
4. Fill in the Gaps
Add smaller 5" balloons using glue dots to fill any empty spaces. For a designer look, create "quad clusters" by tying four small balloons together and attaching them to the garland.
5. Add Accessories
Enhance your arch with accessories like faux greenery, flowers, or mylar balloons. These details can tie the garland into your event theme beautifully.

Step 4: Enjoy Your Stunning Balloon Arch!
Congratulations—you’ve just created your own DIY balloon arch! Balloon arches are versatile and perfect for any celebration, from birthday parties to weddings. Plus, with a high-quality balloon garland kit and these simple steps, you can achieve a professional look without hiring a decorator.
Final Tips for a Successful Balloon Arch
- Start Early: Balloon arches can take 1-3 hours to assemble, depending on their size.
- Practice Makes Perfect: Your first arch might take a bit longer, but the process gets quicker and easier with practice.
- Share Your Success: Don’t forget to take photos and tag us @elliespartysupply!
For the best results, check out our wide selection of high-quality balloon garland kits designed to make your party unforgettable. From custom colors to pre-designed themes, we’ve got everything you need to create a wow-worthy decoration.
So, are you ready to take your party decor to the next level? Let’s get started! 🎈